How to make a simple 2D 'Breakout' game with JavaScript
In this step-by-step tutorial we create a simple Breakout game written entirely in pure JavaScript and rendered on HTML5 <canvas>.
To get the most out of this series of articles you should already have basic to intermediate JavaScript knowledge. After working through this tutorial you should be able to build your own simple Web games.
Step 1: Create the Canvas and draw on it
Before we can start writing the game’s functionality, we need to create a basic structure to render the game inside. This can be done using HTML and the <canvas> element.
HTML structure:
The HTML document structure is quite simple, as the game will be rendered entirely on the <canvas> element. Using your favourite text editor, create a new HTML document, save it as index.html, in a sensible location, and add the following code to it:
<!DOCTYPE html>
<html>
<head>
    <meta charset="utf-8" />
    <title>Gamedev with JS</title>
    <style>
        * { padding: 0; margin: 0; }
        canvas { background: #eee; display: block; margin: 0 auto; }
    </style>
</head>
<body>

<canvas id="myCanvas" width="480" height="320"></canvas>

<script>
    // JavaScript code goes here
</script>

</body>
</html>
We have a charset defined, <title> and some basic CSS in the header. The body contains <canvas> and <script> elements. we will render the game inside the <canvas> element and write the JavaScript code that controls it in <script> element. The <canvas> element has an id of myCanvas to allow us to easily grab a reference to it, and it is 480 pixels wide and 320 pixels high. All the JavaScript code will go between the opening <script>and closing </script> tags.
Canvas basics:
To actually be able to render graphics on the <canvas> element, first we have to grab a reference to it in JavaScript. Add the following below your opening <script> tag.
var canvas = document.getElementById("myCanvas");
var ctx = canvas.getContext("2d");
Here we’re storing a reference to the <canvas> element to the canvas variable. Then we’re creating the ctx variable to store the 2D rendering context — the actual tool we can use to paint on the Canvas.
Let’s see an example piece of code that prints a red square on the canvas. Add this below your previous lines of JavaScript, then load your index.html in a browser to try it out.
ctx.beginPath();
ctx.rect(20, 40, 50, 50);
ctx.fillStyle = "#FF0000";
ctx.fill();
ctx.closePath();
All the instructions are between the beginPath() and closePath() methods. We are defining a rectangle using rect(x,y,w,h): the first two values (x , y) specify the coordinates of the top left corner of the rectangle on the canvas, while the second two (w ,h) specify the width and height of the rectangle. In our case the rectangle is painted 20 pixels from the left side of the screen and 40 pixels from the top side, and is 50 pixels wide and 50 pixels high, which makes it a perfect square. The fillStyle property stores a color that will be used by the fill() method to paint the square, in our case, red.
Let’s not be limited to rectangles — here’s a piece of code for printing out a green circle. Try adding this to your JavaScript, saving and refreshing:
ctx.beginPath();
ctx.arc(240, 160, 20, 0, Math.PI*2, false);
ctx.fillStyle = "green";
ctx.fill();
ctx.closePath();
As you can see we’re using the beginPath() and closePath() methods again. Between them, the most important part of the code above is the arc(x,y,r,s,e,bool) method. It takes six parameters:
- x and y; coordinates of the arc’s center
- arc radius
- s and e, start angle and end angle (what angle to start and finish drawing the circle, in radians)
- Direction of drawing (false for clockwise, the default, or true for anti-clockwise.) This last parameter is optional.
The fillStyle property looks different than before. This is because, just as with CSS, color can be specified as a hexadecimal value, a color keyword, the rgba() function, or any of the other available color methods.
Instead of using fill() and filling the shapes with colors, we can use stroke() to only colour the outer stroke. Try adding this code to your JavaScript too:
ctx.beginPath();
ctx.rect(160, 10, 100, 40);
ctx.strokeStyle = "rgba(0, 0, 255, 0.5)";
ctx.stroke();
ctx.closePath();
The code above prints a blue-stroked empty rectangle. Thanks to the alpha channel in the rgba() function, the blue color is semi-transparent.
Step 2: Moving objects
You already know how to draw an object, so now let’s make it move. Technically, we will be painting the object on the screen, clearing it and then painting it again in a slightly different position every frame to make the impression of movement — just like how movement works with the movies.
Defining a drawing loop:
To keep constantly updating the canvas drawing on each frame, we need to define a drawing function that will run over and over again, with a different set of variable values each time to change sprite positions, etc. You can run a function over and over again using a JavaScript timing function such as setInterval() or requestAnimationFrame().
Delete all the JavaScript you currently have inside your HTML file except for the first two lines, and add the following below them. The draw() function will be executed within setIntervalevery 10 miliseconds:
function draw() {
    // drawing code
}
setInterval(draw, 10);
Thanks to the infinite nature of setInterval the draw() function will be called every 10 milliseconds forever, or until we stop it. Now, let’s draw the ball — add the following inside your draw() function:
ctx.beginPath();
ctx.arc(50, 50, 10, 0, Math.PI*2);
ctx.fillStyle = "#0095DD";
ctx.fill();
ctx.closePath();
Try your updated code now — the ball should be repainted on every frame.
Making it move:
You won’t notice the ball being repainted constantly at the moment, as it’s not moving. Let’s change that. First, instead of a hardcoded position at (50,50) we will define a starting point at the bottom center part of the Canvas in variables called x and y, then use those to define the position the circle is drawn at.
First, add the following two lines above your draw() function, to define x and y:
var x = canvas.width/2;
var y = canvas.height-30;
Next update the draw() function to use the x and y variables in the arc() method, as shown in the following:
function draw() {
    ctx.beginPath();
    ctx.arc(x, y, 10, 0, Math.PI*2);
    ctx.fillStyle = "#0095DD";
    ctx.fill();
    ctx.closePath();
}
Now comes the important part: we want to add a small value to x and y after every frame has been drawn to make it appear that the ball is moving. Let’s define these small values as dx and dy and set their values to 2 and -2 respectively. Add the following below your x and y variable definitions:
var dx = 2;
var dy = -2;
The last thing to do is to update x and y with our dx and dy variable on every frame, so the ball will be painted in the new position on every update. Add the following two new lines indicated below to your draw() function:
function draw() {
    ctx.beginPath();
    ctx.arc(x, y, 10, 0, Math.PI*2);
    ctx.fillStyle = "#0095DD";
    ctx.fill();
    ctx.closePath();
    x += dx;
    y += dy;
}
Save your code again and try it in your browser. This works ok, although it appears that the ball is leaving a trail behind it.

Clearing the canvas before each frame:
The ball is leaving a trail because we’re painting a new circle on every frame without removing the previous one. Don’t worry, because there’s a method to clear canvas content: clearRect(). This method takes four parameters: the x and y coordinates of the top left corner of a rectangle, and the x and y coordinates of the bottom right corner of a rectangle. The whole area covered by this rectangle will be cleared of any content previously painted there.
Add the following highlighted new line to the draw() function:
function draw() {
    ctx.clearRect(0, 0, canvas.width, canvas.height); //highlighted
    ctx.beginPath();
    ctx.arc(x, y, 10, 0, Math.PI*2);
    ctx.fillStyle = "#0095DD";
    ctx.fill();
    ctx.closePath();
    x += dx;
    y += dy;
}
Save your code and try again, and this time you’ll see the ball move without a trail. Every 10 milliseconds the canvas is cleared, the blue circle (our ball) will be drawn on a given position and the x and y values will be updated for the next frame.
Cleaning up our code:
We will be adding more and more commands to the draw() function, so it’s good to keep it as simple and clean as possible. Let’s start by moving the ball drawing code to a separate function.
Replace the existing draw() function with the following two functions:
function drawBall() {
    ctx.beginPath();
    ctx.arc(x, y, 10, 0, Math.PI*2);
    ctx.fillStyle = "#0095DD";
    ctx.fill();
    ctx.closePath();
}

function draw() {
    ctx.clearRect(0, 0, canvas.width, canvas.height);
    drawBall();
    x += dx;
    y += dy;
}
Step 3: collision detection
It is nice to see our ball moving, but it quickly disappears from the screen, limiting the fun we can have with it! To overcome that we will implement some very simple collision detection to make the ball bounce off the four edges of the Canvas.
To detect the collision we will check whether the ball is touching (colliding with) the wall, and if so, we will change the direction of its movement accordingly.
To make the calculations easier let’s define a variable called ballRadius that will hold the radius of the drawn circle and be used for calculations.
Add this to your code, somewhere below the existing variable declarations:
var ballRadius = 10;
Now update the line that draws the ball inside the drawBall() function to this:
ctx.arc(x, y, ballRadius, 0, Math.PI*2);
Bouncing off the top and bottom:
There are four walls to bounce the ball off — let’s focus on the top one first. We need to check, on every frame, whether the ball is touching the top edge of the Canvas — if yes, we’ll reverse the ball movement so it will start to move in the opposite direction and stay within the visible boundaries. Remembering that the coordinate system starts from the top left, we can come up with something like this:
if(y + dy < 0) {
    dy = -dy;
}
If the y value of the ball position is lower than zero, change the direction of the movement on the y axis by setting it equal to itself, reversed. If the ball was moving upwards with a speed of 2 pixels per frame, now it will be moving “up” with a speed of -2 pixels, which actually equals to moving down at a speed of 2 pixels per frame.
The code above would deal with the ball bouncing off the top edge, so now let’s think about the bottom edge:
if(y + dy > canvas.height) {
    dy = -dy;
}
If the ball’s y position is greater than the height of the Canvas (remember that we count the y values from the top left, so the top edge starts at 0 and the bottom edge is at 320 pixels, the Canvas’ height), then bounce it off the bottom edge by reversing the y axis movement as before.
We could merge those two statements into one to save on code verbosity:
if(y + dy > canvas.height || y + dy < 0) {
    dy = -dy;
}
If either of the two statements is true, reverse the movement of the ball.
Bouncing off the left and right:
We have the top and bottom edge covered, so let’s think about the left and right ones. It is very similar actually; all you have to do is to repeat the statements for x instead of y:
if(x + dx > canvas.width || x + dx < 0) {
    dx = -dx;
}

if(y + dy > canvas.height || y + dy < 0) {
    dy = -dy;
}
At this point you should insert the above code block into the draw() function, just before the closing curly brace.
The ball keeps disappearing into the wall!
Test your code at this point, and you will be impressed — now we have a ball that bounced off all four edges of the canvas! We have another problem however — when the ball hits each wall it sinks into it slightly before changing direction:

This is because we’re calculating the collision point of the wall and the center of the ball, while we should be doing it for its circumference. The ball should bounce right after if touches the wall, not when it’s already halfway in the wall, so let’s adjust our statements a bit to include that. Update the last code you added to this:
if(x + dx > canvas.width-ballRadius || x + dx < ballRadius) {
    dx = -dx;
}
if(y + dy > canvas.height-ballRadius || y + dy < ballRadius) {
    dy = -dy;
}
When the distance between the center of the ball and the edge of the wall is exactly the same as the radius of the ball, it will change the movement direction. Subtracting the radius from one edge’s width and adding it onto the other gives us the impression of the proper collision detection — the ball bounces off the walls as it should do.
Step 4: Paddle and keyboard controls
The ball is bouncing off the walls freely and you can watch it indefinitely, but currently there’s no interactivity. It’s not a game if you cannot control it! So let’s add some user interaction: a controllable paddle.
Defining a paddle to hit the ball
So, we need a paddle to hit the ball — let’s define a few variables for that. Add the following variables near the top of your code, beside your other variables:
var paddleHeight = 10;
var paddleWidth = 75;
var paddleX = (canvas.width-paddleWidth)/2;
Here we’re defining the height and width of the paddle, and its starting point on the x axis, for use in calculations further on down the code. Let’s create a function that will draw the paddle on the screen. Add the following just below your drawBall() function:
function drawPaddle() {
    ctx.beginPath();
    ctx.rect(paddleX, canvas.height-paddleHeight, paddleWidth, paddleHeight);
    ctx.fillStyle = "#0095DD";
    ctx.fill();
    ctx.closePath();
}
Allowing the user to control the paddle:
We can draw the paddle wherever we want, but it should respond to the user’s actions — it is time to implement some keyboard controls. We will need:
- Two variables for storing information on whether the left or right control button is pressed.
- Two event listeners for keydown and keyup events — we want to run some code to handle the paddle movement when the buttons are pressed.
- Two functions handling the keydown and keyup events the code that will be run when the buttons are pressed.
- The ability to move the paddle left and right Pressed buttons can be defined and initialized with boolean variables, like so. Add these lines somewhere near the rest of your variables:
var rightPressed = false;
var leftPressed = false;
The default value for both is false because at the beginning the control buttons are not pressed. To listen for key presses, we will set up two event listeners. Add the following lines just above the setInterval() line at the bottom of your JavaScript:
document.addEventListener("keydown", keyDownHandler, false);
document.addEventListener("keyup", keyUpHandler, false);
When the keydown event is fired on any of the keys on your keyboard (when they are pressed), the keyDownHandler() function will be executed. The same pattern is true for the second listener: keyup events will fire the keyUpHandler() function (when the keys stop being pressed). Add these to your code now, below the addEventListener() lines:
function keyDownHandler(e) {
    if(e.keyCode == 39) {
        rightPressed = true;
    }
    else if(e.keyCode == 37) {
        leftPressed = true;
    }
}

function keyUpHandler(e) {
    if(e.keyCode == 39) {
        rightPressed = false;
    }
    else if(e.keyCode == 37) {
        leftPressed = false;
    }
}
When we press a key down, this information is stored in a variable. The relevant variable in each case is set to true. When the key is released, the variable is set back to false.
Both functions take an event as a parameter, represented by the e variable. From that you can get useful information: the keyCode holds the information about the key that was pressed. For example key code 37 is the left cursor key and 39 is the right cursor. If the left cursor is pressed, then the leftPressed variable is set to true, and when it is released the leftPressed variable is set to false. The same pattern follows with the right cursor and the rightPressed variable.
The paddle moving logic
We now have the variables for storing the info about the pressed keys, event listeners and relevant functions set up. Now we’ll get onto the actual code to use all that and move the paddle on the screen. Inside the draw() function, we will check if the left or right cursor keys are pressed when each frame is rendered. Our code might look like this:
if(rightPressed) {
    paddleX += 7;
}
else if(leftPressed) {
    paddleX -= 7;
}
If the left cursor is pressed, the paddle will move 7 pixels to the left, and if the right cursor is pressed, the paddle will move 7 pixels to the right. This currently works ok, but the paddle disappears off the edge of the canvas if we hold either key for too long. We could improve that and move the paddle only within the boundaries of the Canvas by changing the code as follows:
if(rightPressed && paddleX < canvas.width-paddleWidth) {
    paddleX += 7;
}
else if(leftPressed && paddleX > 0) {
    paddleX -= 7;
}
The paddleX position we’re using will move between 0 on the left side of the Canvas and canvas.width-paddleWidth on the right hand side, which will work exactly as we want it.
Add the above code block into the draw() function at the bottom, just above the closing curly brace.
The only thing left to do now is call the drawPaddle() function from within the draw() function, to actually print it on the screen. Add the following line inside your draw() function, just below the line that calls drawBall():
drawPaddle();
Step 5: Game over
It’s fun to watch the ball bouncing off the walls and be able to move the paddle around, but other than that the game does nothing and doesn’t have any progression or end goal. It would be good from the gameplay point of view to be able to lose. The logic behind losing in breakout is simple. If you miss the ball with the paddle and let it reach the bottom edge of the screen, then its game over.
Implementing game over:
Let’s try to implement game over in our game. Here’s the piece of code from step 3 where we made the ball bounce off the walls:
if(x + dx > canvas.width-ballRadius || x + dx < ballRadius) {
    dx = -dx;
}

if(y + dy > canvas.height-ballRadius || y + dy < ballRadius) {
    dy = -dy;
}
Instead of allowing the ball to bounce off all four walls, let’s only allow three now — left, top and right. Hitting the bottom wall will end the game. We’ll edit the second if block so it’s an ‘if else’ block that will trigger our “game over” state upon the ball colliding with the bottom edge of the canvas. For now we’ll keep it simple, showing an alert message and restarting the game by reloading the page. Replace the second if statement with the following:
if(y + dy < ballRadius) {
    dy = -dy;
} else if(y + dy > canvas.height-ballRadius) {
    alert("GAME OVER");
    document.location.reload();
}
Letting the paddle hit the ball:
Now we need to create some kind of collision detection between the ball and the paddle, so it can bounce off it and get back into the play area. The easiest thing to do is to check whether the center of the ball is between the left and right edges of the paddle. Update the last bit of code you modified again, to the following:
if(y + dy < ballRadius) {
    dy = -dy;
} else if(y + dy > canvas.height-ballRadius) {
    if(x > paddleX && x < paddleX + paddleWidth) {
        dy = -dy;
    }
    else {
        alert("GAME OVER");
        document.location.reload();
    }
}
If the ball hits the bottom edge of the Canvas we need to check whether it hits the paddle. If yes, then it bounces off just like you’d expect; if not then the game is over as before.
Step 6: Build the brick field
After modifying the gameplay mechanics, we are now able to lose — this is great as it means the game is finally feeling more like a game. However, it will quickly get boring if all you do is bounce the ball off the walls and the paddle. What a breakout game really needs is some bricks to destroy with the ball, and this is what we’ll create now!
Setting up the brick variables:
Now we will render a few lines of code for the bricks, using a nested loop that works through a two-dimensional array. First however we need to set up some variables to define information about the bricks such as their width and height, rows and columns, etc. Add the following lines to your code below the variables which you have previously declared in your program.
var brickRowCount = 3;
var brickColumnCount = 5;
var brickWidth = 75;
var brickHeight = 20;
var brickPadding = 10;
var brickOffsetTop = 30;
var brickOffsetLeft = 30;
Here we’ve defined the number of rows and columns of bricks, their width and height, the padding between the bricks so they won’t touch each other and a top and left offset so they won’t start being drawn right from the edge of the Canvas.
We will hold all our bricks in a two-dimensional array. It will contain the brick columns ©, which in turn will contain the brick rows ®, which in turn will each contain an object containing the x and y position to paint each brick on the screen. Add the following just below your variables:
var bricks = [];
for(var c=0; c<brickColumnCount; c++) {
    bricks[c] = [];
    for(var r=0; r<brickRowCount; r++) {
        bricks[c][r] = { x: 0, y: 0 };
    }
}
The code above will loop through the rows and columns and create the new bricks. NOTE that the brick objects will also be used for collision detection purposes later.
Brick drawing logic:
Now let’s create a function to loop through all the bricks in the array and draw them on the screen. Our code might look like this:
function drawBricks() {
    for(var c=0; c<brickColumnCount; c++) {
        for(var r=0; r<brickRowCount; r++) {
            bricks[c][r].x = 0;
            bricks[c][r].y = 0;
            ctx.beginPath();
            ctx.rect(0, 0, brickWidth, brickHeight);
            ctx.fillStyle = "#0095DD";
            ctx.fill();
            ctx.closePath();
        }
    }
}
Again, we’re looping through the rows and columns to set the x and y position of each brick, and we’re also painting a brick on the Canvas — size brickWidth x brickHeight — with each loop iteration. The problem is that we’re painting them all in one place, at coordinates (0,0). What we need to do is include some calculations that will work out the x and y position of each brick for each loop iteration.
var brickX = (c*(brickWidth+brickPadding))+brickOffsetLeft;
var brickY = (r*(brickHeight+brickPadding))+brickOffsetTop;
Each brickX position is worked out as brickWidth + brickPadding, multiplied by the column number, c, plus the brickOffsetLeft; the logic for the brickY is identical except that it uses the values for row number, r, brickHeight, and brickOffsetTop. Now every single brick can be placed in its correct place row and column, with padding between each brick, drawn at an offset from the left and top canvas edges.
The final version of the drawBricks() function, after assigning the brickX and brickY values as the coordinates instead of (0,0) each time, will look like this — add this into your code below the drawPaddle() function:
function drawBricks() {
    for(var c=0; c<brickColumnCount; c++) {
        for(var r=0; r<brickRowCount; r++) {
            var brickX = (c*(brickWidth+brickPadding))+brickOffsetLeft;
            var brickY = (r*(brickHeight+brickPadding))+brickOffsetTop;
            bricks[c][r].x = brickX;
            bricks[c][r].y = brickY;
            ctx.beginPath();
            ctx.rect(brickX, brickY, brickWidth, brickHeight);
            ctx.fillStyle = "#0095DD";
            ctx.fill();
            ctx.closePath();
        }
    }
}
Actually drawing the bricks:
Now we need to add a call to drawBricks() somewhere in the draw() function, preferably at the beginning, between the clearing of the Canvas and drawing the ball. Add the following just above the drawBall() call:
drawBricks();
Step 7: Collision detection
We have the bricks appearing on the screen already, but the game still isn’t that interesting as the ball goes through them. We need to think about adding collision detection so it can bounce off the bricks and break them.
It’s our decision how to implement this, of course, but it can be tough to calculate whether the ball is touching the rectangle or not because there are no helper functions in Canvas for this. For the sake of this article we will do it the easiest way possible. We will check if the center of the ball is colliding with any of the given bricks. This won’t give a perfect result every time, and there are much more sophisticated ways to do collision detection, but this will help you to understand the basic concepts.
A collision detection function:
To kick this all off we want to create a collision detection function that will loop through all the bricks and compare every single brick’s position with the ball’s coordinates as each frame is drawn. For better readability of the code we will define the b variable for storing the brick object in every loop of the collision detection:
function collisionDetection() {
    for(var c=0; c<brickColumnCount; c++) {
        for(var r=0; r<brickRowCount; r++) {
            var b = bricks[c][r];
            // calculations
        }
    }
}
If the center of the ball is inside the coordinates of one of our bricks, we’ll change the direction of the ball. For the center of the ball to be inside the brick, all four of the following statements need to be true:
- The x position of the ball is greater than the x position of the brick.
- The x position of the ball is less than the x position of the brick plus its width.
- The y position of the ball is greater than the y position of the brick.
- The y position of the ball is less than the y position of the brick plus its height.
Let’s write that down in code:
function collisionDetection() {
    for(var c=0; c<brickColumnCount; c++) {
        for(var r=0; r<brickRowCount; r++) {
            var b = bricks[c][r];
            if(x > b.x && x < b.x+brickWidth && y > b.y && y < b.y+brickHeight) {
                dy = -dy;
            }
        }
    }
}
Add the above block to your code, below the keyUpHandler() function.
Making the bricks disappear after they are hit:
The above code will work as desired and the ball changes its direction. The problem is that the bricks are staying where they are. We have to figure out a way to get rid of the ones we’ve already hit with the ball. We can do that by adding an extra parameter to indicate whether we want to paint each brick on the screen or not. In the part of the code where we initialize the bricks, let’s add a status property to each brick object. Update the following part of the code as indicated by the highlighted line:
var bricks = [];
for(var c=0; c<brickColumnCount; c++) {
    bricks[c] = [];
    for(var r=0; r<brickRowCount; r++) {
        bricks[c][r] = { x: 0, y: 0, status: 1 }; //highlighted
    }
}
Next we’ll check the value of each brick’s status property in the drawBricks() function before drawing it — if status is 1, then draw it, but if it’s 0, then it was hit by the ball and we don’t want it on the screen anymore. Update your drawBricks() function as follows:
function drawBricks() {
    for(var c=0; c<brickColumnCount; c++) {
        for(var r=0; r<brickRowCount; r++) {
            if(bricks[c][r].status == 1) {
                var brickX = (c*(brickWidth+brickPadding))+brickOffsetLeft;
                var brickY = (r*(brickHeight+brickPadding))+brickOffsetTop;
                bricks[c][r].x = brickX;
                bricks[c][r].y = brickY;
                ctx.beginPath();
                ctx.rect(brickX, brickY, brickWidth, brickHeight);
                ctx.fillStyle = "#0095DD";
                ctx.fill();
                ctx.closePath();
            }
        }
    }
}
Tracking and updating the status in the collision detection function:
Now we need to involve the brick status property in the collisionDetection() function: if the brick is active (its status is 1) we will check whether the collision happens; if a collision does occur we’ll set the status of the given brick to 0 so it won’t be painted on the screen. Update your collisionDetection() function as indicated below:
function collisionDetection() {
    for(var c=0; c<brickColumnCount; c++) {
        for(var r=0; r<brickRowCount; r++) {
            var b = bricks[c][r];
            if(b.status == 1) {
                if(x > b.x && x < b.x+brickWidth && y > b.y && y < b.y+brickHeight) {
                    dy = -dy;
                    b.status = 0;
                }
            }
        }
    }
}
Activating our collision detection:
The last thing to do is to add a call to the collisionDetection() function to our main draw() function. Add the following line to the draw() function, just below the drawPaddle() call:
collisionDetection();
Step 8: Track the score and win
Destroying the bricks is really cool, but to be even more awesome the game could award points for every brick a user hits, and keep count of the total score.
Counting the score:
If you can see your score throughout the game, eventually you can impress your friends. You need a variable to record the score. Add the following into your JavaScript, after the rest of your variables:
var score = 0;
You also need a drawScore() function, to create and update the score display. Add the following after the collisionDetection() function:
function drawScore() {
    ctx.font = "16px Arial";
    ctx.fillStyle = "#0095DD";
    ctx.fillText("Score: "+score, 8, 20);
}
Drawing text on a canvas is similar to drawing a shape. The font definition looks exactly like the one in CSS — you can set the size and font type in the font() method. Then use fillStyle() to set the color of the font and fillText() to set the actual text that will be placed on the canvas, and where it will be placed. The first parameter is the text itself — the code above shows the current number of points — and the last two parameters are the coordinates where the text will be placed on the canvas.
To award a score each time a brick is hit, add a line to the collisionDetection() function to increment the value of the score variable each time a collision is detected. Add the following highlighted line to your code:
function collisionDetection() {
    for(var c=0; c<brickColumnCount; c++) {
        for(var r=0; r<brickRowCount; r++) {
            var b = bricks[c][r];
            if(b.status == 1) {
                if(x > b.x && x < b.x+brickWidth && y > b.y && y < b.y+brickHeight) {
                    dy = -dy;
                    b.status = 0;
                    score++; //highlighted
                }
            }
        }
    }
}
Calling drawScore() from the draw() function keeps the score up to date with every new frame — add the following line inside draw(), just below the drawPaddle() call:
drawScore();
Displaying a winning message when all bricks have been destroyed:
Collecting the points works well, but you won’t be adding them forever — what about when all the bricks have been destroyed? It’s the main purpose of the game after all, so you should display a winning message if all available points have been collected. Add the following highlighted section into your collisionDetection() function:
function collisionDetection() {
    for(var c=0; c<brickColumnCount; c++) {
        for(var r=0; r<brickRowCount; r++) {
            var b = bricks[c][r];
            if(b.status == 1) {
                if(x > b.x && x < b.x+brickWidth && y > b.y && y < b.y+brickHeight) {
                    dy = -dy;
                    b.status = 0;
                    score++;
                    if(score == brickRowCount*brickColumnCount) {
                        alert("YOU WIN, CONGRATULATIONS!");
                        document.location.reload();
                    }
                }
            }
        }
    }
}
Thanks to this, your users can actually win the game when they destroy all the bricks, which is quite important when it comes to games. The document.location.reload() function reloads the page and starts the game again once the alert button is clicked.
Step 10: Mouse controls
The game itself is actually finished, so let’s work on polishing it up. We have already added keyboard controls, but we could easily add mouse controls too.
Listening for mouse movement:
Listening for mouse movement is even easier than listening for key presses: all we need is the listener for the mousemove event. Add the following line in the same place as the other event listeners, just below the keyup event:
document.addEventListener("mousemove", mouseMoveHandler, false);
Anchoring the paddle movement to the mouse movement:
We can update the paddle position based on the pointer coordinates — the following handler function will do exactly that. Add the following function to your code, below the previous line you added:
function mouseMoveHandler(e) {
    var relativeX = e.clientX - canvas.offsetLeft;
    if(relativeX > 0 && relativeX < canvas.width) {
        paddleX = relativeX - paddleWidth/2;
    }
}
In this function we first work out a relativeX value, which is equal to the horizontal mouse position in the viewport (e.clientX) minus the distance between the left edge of the canvas and left edge of the viewport (canvas.offsetLeft) — effectively this is equal to the distance between the canvas left edge and the mouse pointer. If the relative X pointer position is greater than zero and lower than the Canvas width, the pointer is within the Canvas boundaries, and the paddleX position (anchored on the left edge of the paddle) is set to the relativeX value minus half the width of the paddle, so that the movement will actually be relative to the middle of the paddle.
The paddle will now follow the position of the mouse cursor, but since we’re restricting the movement to the size of the Canvas, it won’t disappear completely off either side.
Final step: Finishing up
There’s always room for improvements in any game we write. For example, we can offer more than one life to the player. They could make a mistake or two and still be able to finish the game. We could also improve our code rendering.
Giving the player some lives:
Implementing lives is quite straightforward. Let’s first add a variable to store the number of lives in the same place where we declared our other variables:
var lives = 3;
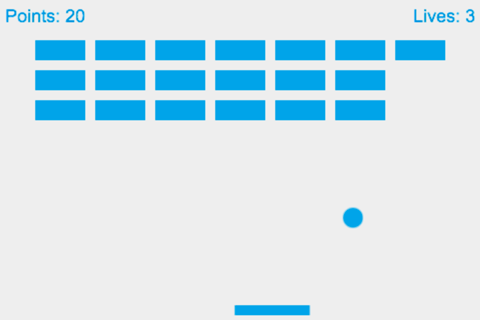
Drawing the life counter looks almost the same as drawing the score counter — add the following function to your code, below the drawScore() function:
function drawLives() {
    ctx.font = "16px Arial";
    ctx.fillStyle = "#0095DD";
    ctx.fillText("Lives: "+lives, canvas.width-65, 20);
}
Instead of ending the game immediately, we will decrease the number of lives until they are no longer available. We can also reset the ball and the paddle positions when the player begins with their next life. So, in the draw() function replace the following two lines:
alert("GAME OVER");
document.location.reload();

With this, we can add slightly more complex logic to it as given below:
lives--;
if(!lives) {
    alert("GAME OVER");
    document.location.reload();
}
else {
    x = canvas.width/2;
    y = canvas.height-30;
    dx = 2;
    dy = -2;
    paddleX = (canvas.width-paddleWidth)/2;
}
Now, when the ball hits the bottom edge of the screen, we’re subtracting one life from the lives variable. If there are no lives left, the game is lost; if there are still some lives left, then the position of the ball and the paddle are reset, along with the movement of the ball.
Rendering the lives display:
Now you need to add a call to drawLives() inside the draw() function and add it below the drawScore() call.
drawLives();
Improving rendering with requestAnimationFrame():
Now let’s work on something that is not connected to the game mechanics, but to the way it is being rendered. requestAnimationFrame helps the browser render the game better than the fixed framerate we currently have implemented using setInterval(). Replace the following line:
setInterval(draw, 10);

with simply:
draw();
Then, at the very bottom of the draw() function (just before the closing curly brace), add in the following line, which causes the draw() function to call itself over and over again:
requestAnimationFrame(draw);
The draw() function is now getting executed again and again within a requestAnimationFrame() loop, but instead of the fixed 10 milliseconds frame rate, we are giving control of the framerate back to the browser. It will sync the framerate accordingly and render the shapes only when needed. This produces a more efficient, smoother animation loop than the older setInterval() method.
That’s all — the final version of the game is ready and set to go!
#JS_Code
var canvas = document.getElementById("myCanvas");
var ctx = canvas.getContext("2d");
var ballRadius = 10;
var x = canvas.width/2;
var y = canvas.height-30;
var dx = 2;
var dy = -2;
var paddleHeight = 10;
var paddleWidth = 75;
var paddleX = (canvas.width-paddleWidth)/2;
var rightPressed = false;
var leftPressed = false;
var brickRowCount = 5;
var brickColumnCount = 3;
var brickWidth = 75;
var brickHeight = 20;
var brickPadding = 10;
var brickOffsetTop = 30;
var brickOffsetLeft = 30;
var score = 0;
var lives = 3;

var bricks = [];
for(var c=0; c<brickColumnCount; c++) {
  bricks[c] = [];
  for(var r=0; r<brickRowCount; r++) {
    bricks[c][r] = { x: 0, y: 0, status: 1 };
  }
}

document.addEventListener("keydown", keyDownHandler, false);
document.addEventListener("keyup", keyUpHandler, false);
document.addEventListener("mousemove", mouseMoveHandler, false);

function keyDownHandler(e) {
  if(e.keyCode == 39) {
    rightPressed = true;
  }
  else if(e.keyCode == 37) {
    leftPressed = true;
  }
}
function keyUpHandler(e) {
  if(e.keyCode == 39) {
    rightPressed = false;
  }
  else if(e.keyCode == 37) {
    leftPressed = false;
  }
}
function mouseMoveHandler(e) {
  var relativeX = e.clientX - canvas.offsetLeft;
  if(relativeX > 0 && relativeX < canvas.width) {
    paddleX = relativeX - paddleWidth/2;
  }
}
function collisionDetection() {
  for(var c=0; c<brickColumnCount; c++) {
    for(var r=0; r<brickRowCount; r++) {
      var b = bricks[c][r];
      if(b.status == 1) {
        if(x > b.x && x < b.x+brickWidth && y > b.y && y < b.y+brickHeight) {
          dy = -dy;
          b.status = 0;
          score++;
          if(score == brickRowCount*brickColumnCount) {
            alert("YOU WIN, CONGRATS!");
            document.location.reload();
          }
        }
      }
    }
  }
}

function drawBall() {
  ctx.beginPath();
  ctx.arc(x, y, ballRadius, 0, Math.PI*2);
  ctx.fillStyle = "#0095DD";
  ctx.fill();
  ctx.closePath();
}
function drawPaddle() {
  ctx.beginPath();
  ctx.rect(paddleX, canvas.height-paddleHeight, paddleWidth, paddleHeight);
  ctx.fillStyle = "#0095DD";
  ctx.fill();
  ctx.closePath();
}
function drawBricks() {
  for(var c=0; c<brickColumnCount; c++) {
    for(var r=0; r<brickRowCount; r++) {
      if(bricks[c][r].status == 1) {
        var brickX = (r*(brickWidth+brickPadding))+brickOffsetLeft;
        var brickY = (c*(brickHeight+brickPadding))+brickOffsetTop;
        bricks[c][r].x = brickX;
        bricks[c][r].y = brickY;
        ctx.beginPath();
        ctx.rect(brickX, brickY, brickWidth, brickHeight);
        ctx.fillStyle = "#0095DD";
        ctx.fill();
        ctx.closePath();
      }
    }
  }
}
function drawScore() {
  ctx.font = "16px Arial";
  ctx.fillStyle = "#0095DD";
  ctx.fillText("Score: "+score, 8, 20);
}
function drawLives() {
  ctx.font = "16px Arial";
  ctx.fillStyle = "#0095DD";
  ctx.fillText("Lives: "+lives, canvas.width-65, 20);
}

function draw() {
  ctx.clearRect(0, 0, canvas.width, canvas.height);
  drawBricks();
  drawBall();
  drawPaddle();
  drawScore();
  drawLives();
  collisionDetection();

  if(x + dx > canvas.width-ballRadius || x + dx < ballRadius) {
    dx = -dx;
  }
  if(y + dy < ballRadius) {
    dy = -dy;
  }
  else if(y + dy > canvas.height-ballRadius) {
    if(x > paddleX && x < paddleX + paddleWidth) {
      dy = -dy;
    }
    else {
      lives--;
      if(!lives) {
        alert("GAME OVER");
        document.location.reload();
      }
      else {
        x = canvas.width/2;
        y = canvas.height-30;
        dx = 3;
        dy = -3;
        paddleX = (canvas.width-paddleWidth)/2;
      }
    }
  }

  if(rightPressed && paddleX < canvas.width-paddleWidth) {
    paddleX += 7;
  }
  else if(leftPressed && paddleX > 0) {
    paddleX -= 7;
  }

  x += dx;
  y += dy;
  requestAnimationFrame(draw);
}

draw();